

Key Takeaways
- Importance of Control Arm Bushings: Worn upper control arm bushings can negatively impact the handling, steering response, and tire wear of your Chevrolet S10, making replacement critical for vehicle performance.
- Essential Tools and Materials: Gather necessary tools such as a socket set, wrench set, jack stands, and a grease gun, along with quality replacement bushings (OEM or polyurethane) for an effective bushing replacement.
- Safety First: Prioritize safety by wearing personal protective equipment like gloves and safety glasses, parking on a level surface, using jack stands, and disconnecting the battery to prevent accidents.
- Step-by-Step Replacement Guide: Follow a detailed process that includes preparing the vehicle, removing old bushings, installing new ones, and ensuring proper reattachment and torque specifications.
- Post-Installation Checks: Always check the vehicle’s alignment and perform a test drive after installation to ensure everything functions smoothly and to prevent uneven tire wear.
- Avoid Common Pitfalls: Steer clear of oversights such as neglecting safety gear, skipping torque specifications, and rushing the process to ensure a successful and safe bushing replacement.
Have you noticed your Chevrolet S10 handling a bit rough lately? Worn upper control arm bushings can lead to poor steering response and uneven tire wear. If you’re feeling the bumps more than usual or hearing strange noises, it might be time to tackle this DIY project.
Tools And Materials Needed
Replacing upper control arm bushings on your Chevrolet S10 requires a specific set of tools and materials. Having the right items on hand streamlines the process and ensures successful completion.
Recommended Products

Backed by superior materials and rigorous testing, MOOG control arm bushings deliver reliable performance you can count on. MOOG problem-solving innovations ensure fast, hassle-free installation.

Quickly and efficiently removing and installing the upper control arm bushings can greatly save you time and effort.
Essential Tools
- Socket Set: Use a socket set, specifically 10mm and 15mm sockets, for most bolts.
- Wrench Set: Utilize an adjustable wrench or combination wrenches for tight spaces.
- Hammer: A rubber mallet is useful for gently tapping bushings into place without damaging them.
- Pry Bar: A pry bar helps with the removal of old bushings and separating components.
- Jack and Jack Stands: Securely lift the vehicle to access the control arms safely.
- Torque Wrench: Tightening bolts to manufacturer specifications ensures proper assembly.
- Grease Gun: Lubricate new bushings to reduce wear and improve performance.
Replacement Bushings
- Performance Bushings: Select high-quality, performance-grade bushings for better durability and handling.
- OEM Bushings: Consider using original equipment manufacturer (OEM) bushings for a factory-like fit.
- Polyurethane Bushings: These offer increased stiffness and longevity compared to rubber options.
Gather these tools and materials before starting the replacement. This preparation leads to a smoother and more efficient repair process.
Safety Precautions
Prioritizing safety is crucial when replacing upper control arm bushings on your Chevrolet S10. Follow these precautions to protect yourself and your vehicle.
Personal Protective Equipment
- Wear gloves: Protect your hands from grease, sharp edges, and chemicals.
- Use safety glasses: Shield your eyes from debris and flying objects during the process.
- Don a dust mask: Prevent inhalation of dust and particles, especially when working with old bushings.
Vehicle Safety Measures
- Park on a level surface: Ensure stability while working on your vehicle.
- Engage the parking brake: This prevents any unexpected movements during the repair.
- Use jack stands: Always support the vehicle with jack stands after lifting it with a jack. Never rely on the jack alone.
- Disconnect the battery: Eliminate any electrical risks by disconnecting the negative terminal before starting.
- Keep the workspace tidy: Maintain a clean area around your vehicle to prevent tripping hazards or losing tools.
Adhering to these precautions ensures a safer and more efficient repair process.
Step-By-Step Instructions
Replacing upper control arm bushings on a Chevrolet S10 involves a series of straightforward steps. Follow this detailed guide for efficient and safe repairs.
Recommended Products

[Premium Material] Front Control Arm. With over 30 years of experience, built with high quality material, referring to international original factory standard and multiple tests, ensure quality and durability.

【Control Arms Fitment】 The 2PCS front upper control arms kit is compatible with Chevrolet S10 Blazer 1983-1994, Chevrolet Blazer 1995-2005, Chevrolet S10 (Pickup) 1982-2003, and fits for Isuzu Hombre 1998-2000, Oldsmobile Cutlass 1985-1987, Oldsmobile Cutlass Salon 1985-1987
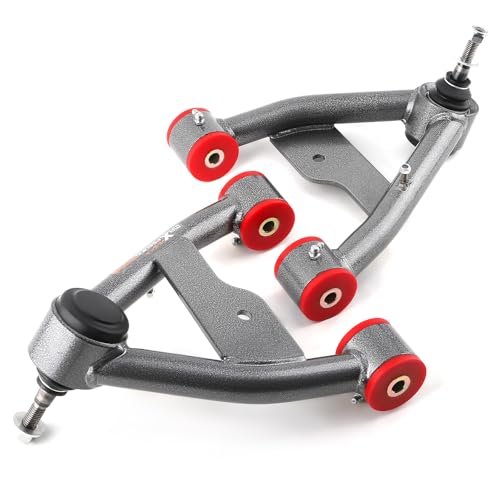
[Fitment] Upper control arm fits for Chevy S10 1982-2004 4WD, for Chevy S10 Blazer 1983-1994 4WD, for Chevy Blazer 1983-2005 4WD, for GMC S15 1982-1990 4WD, for GMC S15 Jimmy 1983-1991 4WD, for GMC Sonoma 1991-2004 4WD
Preparing The Vehicle
- Park on a level surface. Ensure the vehicle is on a flat area to prevent movement.
- Engage the parking brake. This secures the vehicle during repairs.
- Disconnect the battery. Remove the negative terminal to prevent electrical shorts.
- Lift the vehicle. Use a jack to elevate the front, then secure it on jack stands. Ensure stands are stable before proceeding.
- Remove the front wheels. Take off the lug nuts with a wrench and then the wheels to access the control arm.
Removing The Old Bushings
- Locate the upper control arm. Identify the control arm connected to the frame and the steering knuckle.
- Remove bolts securing the control arm. Use a socket to loosen and take out the bolts. Keep these bolts for reinstallation.
- Detach the control arm from the vehicle. Gently pull the arm away from the frame.
- Extract the bushings. If they’re pressed in, use a pry bar or rubber mallet for removal. Take care not to damage the control arm.
- Inspect the control arm. Check for cracks or wear, replacing it if necessary.
Installing The New Bushings
- Align the new bushings. Ensure they’re oriented correctly according to manufacturer specifications.
- Press the bushings into the control arm. You may need a bushing press or socket for a snug fit. Apply grease to ease installation.
- Reattach the control arm. Position it in place and loosely secure with bolts.
- Torque the bolts. Follow manufacturer specifications for proper torque settings using a torque wrench.
- Reinstall the wheels. Place the wheels back on and secure them with lug nuts.
- Reconnect the battery. Attach the negative terminal firmly.
- Test drive the vehicle. Ensure everything functions smoothly and listen for any unusual sounds.
Following these steps will ensure a successful replacement of your upper control arm bushings on your Chevrolet S10. Stay organized and work methodically for the best results.
Tips For A Successful Replacement
Follow these tips to enhance your experience when replacing upper control arm bushings on a Chevrolet S10.
Recommended Products

Control Arm Bushings Replacement for Buick 1979-1985 Riviera - [1979-1985 Cadillac Eldorado] - 1980-1985 Cadillac Seville - [2004-2005 Chevrolet Blazer (RWD)] - 1995-2001 Chevrolet Blazer (AWD) - [1995-2005 Chevrolet Blazer (4WD)] - 2004 Chevrolet S10 - [1983-2003 Chevrolet S10 (4WD)] - 1983-1994 Chevrolet S10 Blazer (4WD) - [1992-2002 GMC Jimmy (4WD)] - 1995-2000 GMC Jimmy (AWD)

Every TRW part has four levels of testing/technical/audit review before approval is given including endurance testing of 500K cycles

Backed by superior materials and rigorous testing, MOOG control arm bushings deliver reliable performance you can count on. MOOG problem-solving innovations ensure fast, hassle-free installation.
Checking Alignment
After completing the bushing replacement, checking the vehicle’s alignment is crucial. Misalignment can lead to uneven tire wear and poor handling. Use a professional alignment service or follow this simple procedure:
- Use a Tape Measure: Measure the distance between the front tires at the front and rear sides.
- Adjust as Needed: Ensure the distances match. If they don’t, adjust the alignment according to the specifications for your S10.
- Test Drive: After adjustments, take the vehicle for a short drive to feel how it handles. Watch for any pulling to one side.
Common Mistakes To Avoid
Avoid these common mistakes to ensure a smooth repair process:
- Skipping Safety Gear: Always wear gloves and safety glasses to protect yourself from debris and injury.
- Neglecting Torque Specs: Failures come from not properly torquing bolts. Refer to your service manual for the correct torque values.
- Ignoring Control Arm Condition: Check the control arm for damage before installing new bushings. Cracks or bends can lead to future problems.
- Rushing the Process: Take your time during disassembly and reassembly. Hurrying leads to mistakes and potential damage.
- Forgetting Lubrication: Apply grease to the new bushings per manufacturer instructions. Proper lubrication ensures longevity and reduces friction.
Sticking to these guidelines helps ensure a successful replacement, leading to improved vehicle performance on the road.
Conclusion
Replacing the upper control arm bushings on your Chevrolet S10 can seem daunting but it’s a rewarding DIY project. By following the steps outlined and taking the necessary safety precautions you’ll not only enhance your vehicle’s performance but also save on repair costs.
Remember to take your time and double-check your work as you go. After the installation don’t forget to check the alignment to keep your ride smooth and prevent uneven tire wear. With a little patience and the right tools you’ll be back on the road enjoying a more responsive drive in no time. Happy wrenching!
Frequently Asked Questions
What are the symptoms of worn upper control arm bushings in a Chevrolet S10?
Worn upper control arm bushings can lead to poor steering response, uneven tire wear, increased bumps while driving, and unusual noises. If you notice any of these symptoms, it may indicate a need for replacement.
What tools do I need to replace upper control arm bushings?
Essential tools include a socket set, wrench set, rubber mallet, pry bar, jack and jack stands, torque wrench, and grease gun. Having these tools ready will help ensure a smoother repair process.
How do I ensure safety while replacing upper control arm bushings?
Safety precautions include wearing gloves, safety glasses, and a dust mask. Additionally, park on a level surface, engage the parking brake, and use jack stands for stability. Always disconnect the battery before starting work.
What is the process for replacing upper control arm bushings?
First, prepare the vehicle and lift it safely. Remove the front wheels, detach the upper control arm, extract old bushings, and inspect the control arm. Then, install the new bushings, reattach the control arm, torque the bolts, reinstall the wheels, reconnect the battery, and test drive.
Why is checking alignment important after replacing bushings?
Checking alignment after replacing bushings helps prevent uneven tire wear and poor handling. A simple tape measure can be used to confirm proper alignment and adjust if necessary, ensuring optimal vehicle performance.
What common mistakes should I avoid during this repair?
Avoid skipping safety gear, neglecting torque specifications, overlooking control arm condition, rushing the process, and forgetting lubrication. Following detailed guidelines helps ensure a successful and safe replacement.
